
10.自动化篇-手写脚本一键自动tag、发包、引导登录npm
🍑 一、新增脚本文件&命令&核心流程
在项目的src/scripts目录下新增文件,增加release.js文件,文件内容如下
/*** 主函数入口*/async function main() {try {} catch (error) {console.error('❌ 发生错误:', error);}}main();
在项目的package.json中增加如下命令,后续我们使用npm run release一键更新npm版本、Git缓存更改、自动标记tag、自动发布到npm。
"release": "node ./scripts/release.js"
核心流程伪代码如下:
let newVersion = getNewVersion();// 更新版本号updateVersion(newVersion);// git增加tag并提交gitOperations(newVersion);// 设置npm源const oldRegistryUrl = await setNpmRegistry();// 检测是否已经登录npmawait ensureNpmLoggedIn();// 发布到npmawait publishToNpm();// 恢复npm源await restoreNpmRegistry(oldRegistryUrl);
🥑 二、获取当前已经发布的最新的的版本号
npm show ${packageName} version 是一个用于检索指定 npm 包的最新版本信息的命令。通过运行这个命令,可以查看指定包的最新版本号。
${packageName}:这里是指要查找的 npm 包的名称。
举个例子,如果要查看包名为inquirer的最新版本号
npm show inquirer version
运行以上命令后,npm 将返回inquirer包的最新版本号

实现函数如下
const exec = util.promisify(require('child_process').exec);/*** 获取最新版本号* @returns Promise*/async function getLatestVersion() {try {const {stdout} = await exec(`npm show ${packageName} version`);const latestVersion = stdout.trim().replace(/^v/, ''); // 删除可能存在的前导 vreturn latestVersion;} catch (error) {console.error(`❌ 获取最新版本失败: ${error.message}`);throw error; // 抛出错误,以便可以在调用此函数的地方捕获并处理}}
解释下
const exec = util.promisify(require('child_process').exec);
这行代码的作用是将 Node.js 中的回调风格的函数转换为 Promise 风格的函数,使得可以更方便地处理异步操作。
具体解释如下:
require('child_process').exec:这里是通过require函数引入node核心模块child_process中的exec方法,exec方法用于在子进程中执行shell命令。util.promisify:这是node中的util模块提供的方法,用于将一个遵循回调函数规则的方法转换成返回 Promise 的函数。这里将child_process.exec方法转换为Promise风格的方法。const exec = util.promisify(require('child_process').exec);:将经过util.promisify处理后的child_process.exec方法赋值给一个新的常量exec,从而创建了一个返回Promise的新函数exec。
我们更改主函数如下:
/*** 主函数入口*/async function main() {try {const latestVersion = await getLatestVersion();} catch (error) {console.error('❌ 发生错误:', error);}}main();
🍒 三、实现显示选择界面
1.inquirer的基本使用
这里使用的是inquirer库,Inquirer 用于创建交互式命令行界面。它提供了丰富的方式来与用户进行交互,例如提问问题、接收用户输入并根据用户的响应执行相应的操作。
以下是使用 Inquirer 的基本步骤:
安装 Inquirer:首先需要在项目中安装
Inquirer模块。可以使用以下命令通过 npm 进行安装:npm install inquirer引入 Inquirer 模块:在项目中引入 Inquirer 模块,以便在代码中使用它:
const inquirer = require('inquirer');创建问题数组:通过创建一系列问题的数组来定义需要向用户提出的问题。每个问题可以包括类型、消息、选择项等属性。
const questions = [{type: 'input',name: 'username',message: '请输入您的用户名:'},{type: 'list',name: 'color',message: '请选择您喜欢的颜色:',choices: ['红色', '蓝色', '绿色']}];使用 Inquirer 提出问题:调用
inquirer.prompt()方法并传入问题数组来开始与用户交互。用户将依次回答每个问题。inquirer.prompt(questions).then(answers => {console.log('您输入的用户名是:', answers.username);console.log('您选择的颜色是:', answers.color);}).catch(error => {console.error('交互过程中出错:', error);});
2.实现我们需要的界面
之前我们已经介绍过了npm的工程管理命令,这里函数的逻辑就根据选择的版本类型,根据上面获取到的当前最新版包计算出新发布的版本信息。
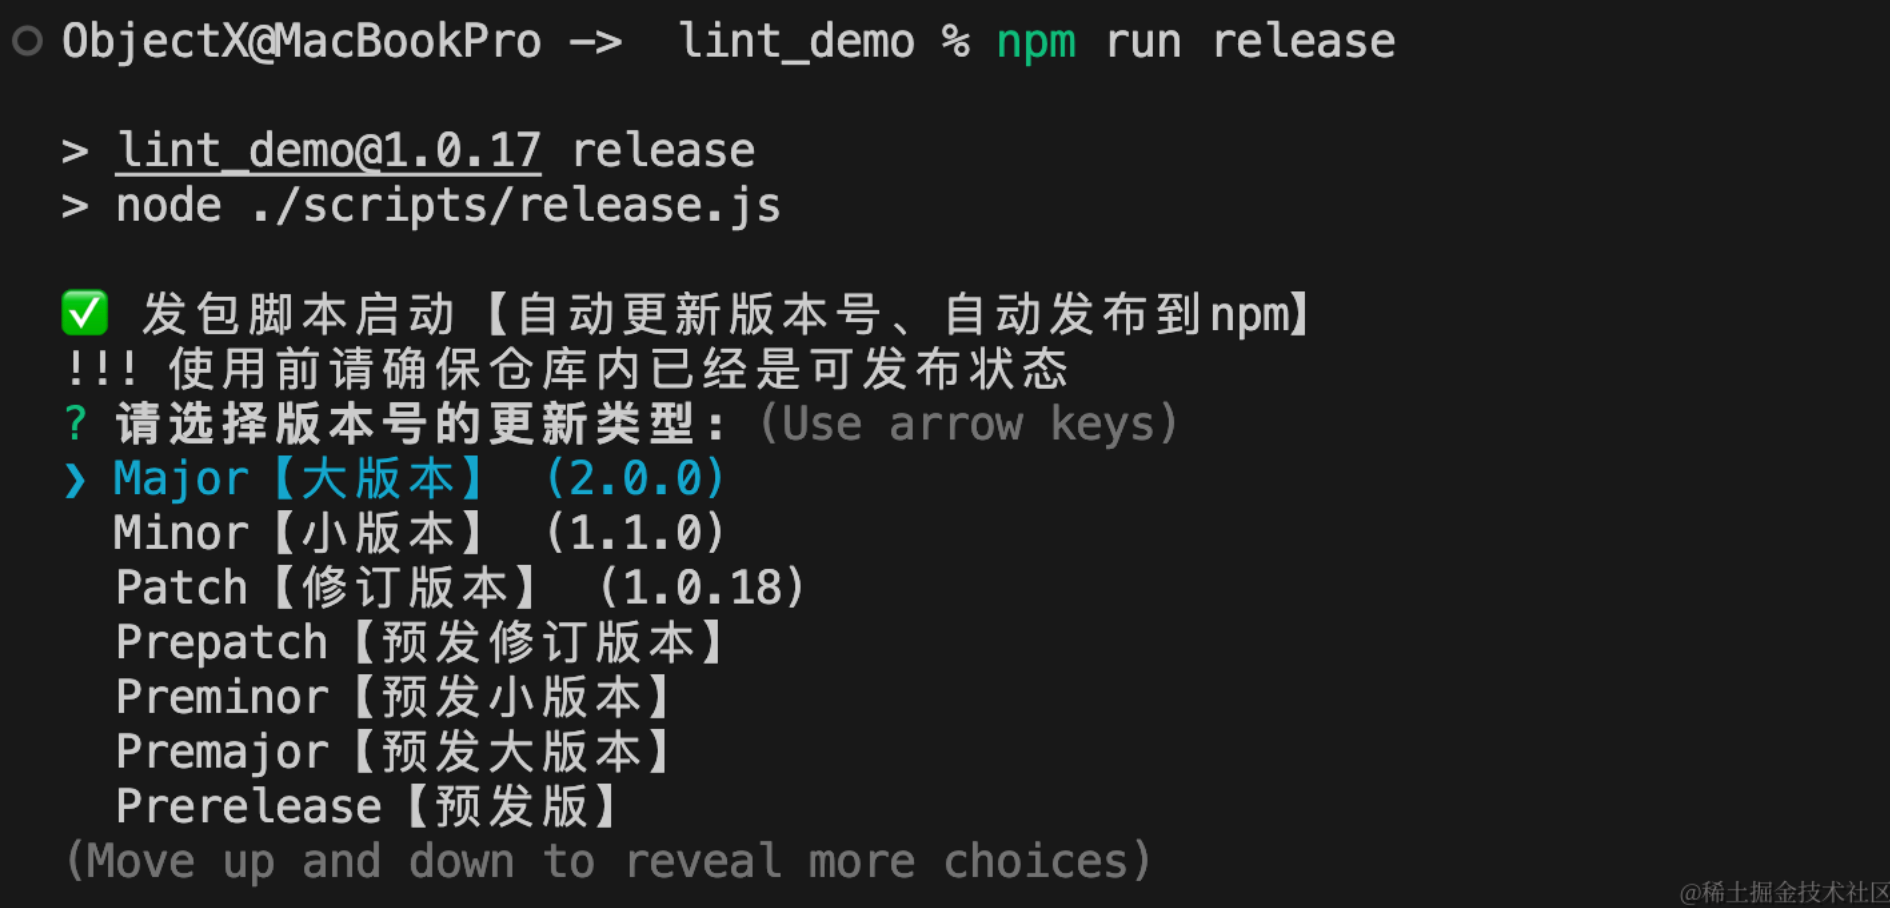
代码如下:
/*** 命令行显示逻辑* @param {*} latestVersion*/async function displayOptions(latestVersion) {console.log('✅ 发包脚本启动【自动更新版本号、自动发布到npm】');console.log('!!! 使用前请确保仓库内已经是可发布状态');const currentVersion = parseVersion(latestVersion);const choices = [{name: `Major【大版本】 (${parseInt(currentVersion.major) + 1}.0.0)`,value: 'major',},{name: `Minor【小版本】 (${currentVersion.major}.${parseInt(currentVersion.minor) + 1}.0)`,value: 'minor',},{name: `Patch【修订版本】 (${currentVersion.major}.${currentVersion.minor}.${parseInt(currentVersion.patch) + 1})`,value: 'patch',},{name: `Prepatch【预发修订版本】`, value: 'prepatch'},{name: `Preminor【预发小版本】`, value: 'preminor'},{name: `Premajor【预发大版本】`, value: 'premajor'},{name: `Prerelease【预发版】`, value: 'prerelease'},{name: `Specific version【指定版本】`, value: 'specific'},];inquirer.prompt([{type: 'list',name: 'releaseType',message: '请选择版本号的更新类型:',choices: choices,},{type: 'input',name: 'specificVersion',message: '输入具体的版本号:',when: (answers) => answers.releaseType === 'specific',validate: (input) =>/\d+\.\d+\.\d+(-\w+\.\d+)?/.test(input) ||'版本号必须符合语义化版本控制规范。',},]).then(async (answers) => {// TODO:选择后的处理逻辑});}
🥝 四、实现将新版本号写入package.json
这里我们区分正常版本发布和预发布两种
let newVersion = '';// 指定版本号,自己指定的版本号if (answers.releaseType === 'specific') {newVersion = answers.specificVersion;} else if (['major', 'minor', 'patch'].includes(answers.releaseType)) {// 非预发版本,上面计算出来的值currentVersion[answers.releaseType]++;newVersion = `${currentVersion.major}.${currentVersion.minor}.${currentVersion.patch}`;} else {// 预发布版本,也是上面的计算逻辑,这里我们提出来了newVersion = getPreReleaseVersion(currentVersion, answers.releaseType);}// 更新版本号,写入到`package.json`中updateVersion(newVersion);
预发布版本计算,个人开发一般也不用这种,但是我们还是实现一下
/*** 检测是否是预发布版本* @param {*} version*/function isPreRelease(version) {return /-/.test(version);}/*** 获取预发布版本号* @param {*} currentVersion* @param {*} type*/function getPreReleaseVersion(currentVersion, type) {let {major, minor, patch, preReleaseLabel, preReleaseVersion} =currentVersion;switch (type) {case 'prepatch':patch += 1;return `${major}.${minor}.${patch}-0`;case 'preminor':minor += 1;return `${major}.${minor}.0-0`;case 'premajor':major += 1;return `${major}.0.0-0`;case 'prerelease':if (isPreRelease(`${major}.${minor}.${patch}`)) {preReleaseVersion = preReleaseVersion || 0;return `${major}.${minor}.${patch}-${preReleaseLabel || 'beta'}.${preReleaseVersion + 1}`;} else {return `${major}.${minor}.${patch}-beta.0`;}default:throw new Error(`❌ 不支持的预发布版本类型: ${type}`);}}
写入到package.json中
/*** 更新版本号* @param {*} newVersion*/function updateVersion(newVersion) {packageJson.version = newVersion;fs.writeFileSync(packageJsonPath, JSON.stringify(packageJson, null, 2));console.log(`✅ 版本号已更新为 ${newVersion}`);}
🍐 五、实现Git标记tag并推送远端
这里使用的是当前分支,需要当前分支是否关联了远端分支,如果未关联,我们给他关联上,关联完成后我们给他标记tag并推送到远端。
/*** 标记tag* @param {*} newVersion*/function gitOperations(newVersion) {try {process.chdir(projectRootPath); // Change the current working directory to project root// 获取当前分支名称const branchName = execSync('git rev-parse --abbrev-ref HEAD').toString().trim();// 检查是否有设置 upstream(远程跟踪分支)let setUpstream = false;try {execSync(`git rev-parse --abbrev-ref --symbolic-full-name @{u}`);} catch (error) {// 如果没有设置 upstream,为远程的同名分支设置 upstreamconst remoteBranchExists = execSync(`git ls-remote --heads origin ${branchName}`,).toString().trim();if (remoteBranchExists) {execSync(`git branch --set-upstream-to=origin/${branchName}`);} else {console.error(`❌ 远程分支 'origin/${branchName}' 不存在,无法设置 upstream。`,);return;}setUpstream = true;}execSync(`git add .`, {stdio: 'inherit'});execSync(`git commit -m "chore(release): ${newVersion}"`, {stdio: 'inherit',});execSync(`git tag v${newVersion}`, {stdio: 'inherit'});// 推送改动到远程分支execSync(`git push`, {stdio: 'inherit'});if (setUpstream) {// 如果之前没有 upstream,并且我们为其设置了 upstream,现在也推送它execSync(`git push --set-upstream origin ${branchName}`, {stdio: 'inherit',});}// 推送tag到远程execSync(`git push origin v${newVersion}`, {stdio: 'inherit'});console.log(`✅ Git tag v${newVersion} 已标记`);} catch (error) {console.error(`❌ Git 操作失败: ${error.message}`);}}
🍉 六、实现设置npm源
处理这个是因为我们可能使用nrm更改过npm的源,或者使用.npmrc,时候如果不更换会无法登录或者脚本执行流程正确,比如改成淘宝的之类,源不对没法发布,我们先记录当前npm源,检测是否已经登录npm、未登录提示登录、发布包、然后恢复npm源
// 设置npm源const oldRegistryUrl = await setNpmRegistry();// 检测是否已经登录npmawait ensureNpmLoggedIn();// 发布到npmawait publishToNpm();// 恢复npm源await restoreNpmRegistry(oldRegistryUrl);
1.保存旧的npm源并更新
主要就是先npm config get registry,然后在npm config set registry,如果是私域的npm,你可以更改这里的url,或者直接扩展这个脚本,改成询问的方式,使用nrm切换
/*** 设置npm的registry到指定的URL,并返回旧的registry* @returns {Promise<string>} 当成功时返回旧的registry URL*/async function setNpmRegistry() {try {const {stdout: getRegistryStdout} = await exec(`npm config get registry`);const oldNpmRegistry = getRegistryStdout.trim();const NPM_REGISTRY_URL = 'https://registry.npmjs.org/';await exec(`npm config set registry ${NPM_REGISTRY_URL}`);console.log(`✅ npm registry已设置为: ${NPM_REGISTRY_URL}`);return oldNpmRegistry; // 返回旧的registry,以便后续可以恢复} catch (error) {if (error.stdout) {console.error(`❌ 设置npm registry stdout输出流: ${error.stdout}`);}if (error.stderr) {console.error(`❌ 设置npm registry stderr出错: ${error.stderr}`);}console.error(`❌ 设置npm registry中发生错误: ${error.message}`);throw error; // 抛出错误以供调用者处理}}
2.检测是否已经登录npm
之前的文章中我们已经介绍过,未登录npm是无法发包的,但是自动化的脚本对于这种敏感信息引导用户手动登录比较安全,这里我们通过npm whoami命令判断用户是否登录,如果未登录,引导用户登录
/*** 确保用户已登录npm* @returns {Promise<string>} 返回已登录用户的名称或抛出错误*/async function ensureNpmLoggedIn() {try {const {stdout} = await exec('npm whoami');console.log(`✅ 检测到您已作为${stdout.trim()}登录到npm`);return stdout.trim();} catch (error) {console.error('❌ 您似乎还没有登录到npm。请登录后继续。');const answers = await inquirer.prompt([{type: 'input',name: 'username',message: '请输入您的npm用户名:',},{type: 'password',name: 'password',message: '请输入您的npm密码:',},{type: 'input',name: 'email',message: '请输入您的npm邮箱地址:',},]);// 以下操作依赖于能够自动化的输入命令到npm login(在这个假设下编写)// 实际操作中这可能需要特殊处理,例如通过node-pty实现自动输入const {stdout: loginStdout} = await exec(`echo "${answers.username}\n${answers.password}\n${answers.email}\n" | npm login`,);console.log('✅ 登录输出流loginStdout', loginStdout);return answers.username;}}
3.发布到npm
使用npm publish命令发布。
/*** 异步地发布到npm* @returns {Promise<void>}*/async function publishToNpm() {console.log('🚀🚀🚀 正在发布到 npm...');try {// 这里可以添加对newVersion的使用,例如修改package.json中的版本号// 如果newVersion参数确实需要被用于发布特定版本,这里应该加入对版本号处理的逻辑// 例如使用 npm version 命令来更新项目的版本号const {stdout, stderr} = await exec('npm publish');if (stderr) {console.log(`✅ 发布输出流stderr: ${stderr}`);}console.log(`🎉🎉🎉 npm包发布成功: ${stdout}`);} catch (error) {console.error(`❌ 发布失败: ${error.message}`);throw error; // 抛出错误以供调用方处理}}
4.恢复npm源
根据之前保存的旧的npm源,还原
/*** 恢复npm的registry为旧的URL* @returns {Promise<void>}*/async function restoreNpmRegistry(oldNpmRegistry) {if (oldNpmRegistry) {try {await exec(`npm config set registry ${oldNpmRegistry}`);console.log(`✅ npm registry已恢复为: ${oldNpmRegistry}`);} catch (error) {if (error.stdout) {console.error(`✅ 恢复npm registry输出流: ${error.stdout}`);}if (error.stderr) {console.error(`❌ 恢复npm registry出错: ${error.stderr}`);}console.error(`❌ 恢复npm registry中发生错误: ${error.message}`);throw error; // 抛出错误以供调用方处理}} else {console.error(`❌ 未找到旧的npm registry,无法恢复。`);throw new Error(`❌ 未找到旧的npm registry,无法恢复。`);}}
完整代码&代码仓库
组件库仓库切换到rollup_comp分支即是完整的项目,脚本已上传
const {execSync} = require('child_process');const util = require('util');// 改为异步:包裹返回promiseconst fs = require('fs');const path = require('path');const inquirer = require('inquirer');const exec = util.promisify(require('child_process').exec);const projectRootPath = path.join(__dirname, '..');const packageJsonPath = path.join(projectRootPath, 'package.json');const packageJson = JSON.parse(fs.readFileSync(packageJsonPath, 'utf8'));const packageName = packageJson.name;/*** 解析版本号* @param {*} version* @returns*/function parseVersion(version) {const [semver, preReleaseTag = ''] = version.split('-');const [major, minor, patch] = semver.split('.').map(Number);const [preReleaseLabel, preReleaseVersion] = preReleaseTag.split('.');return {major,minor,patch,preReleaseLabel,preReleaseVersion: preReleaseVersion ? parseInt(preReleaseVersion, 10) : 0,};}/*** 检测是否是预发布版本* @param {*} version*/function isPreRelease(version) {return /-/.test(version);}/*** 获取预发布版本号* @param {*} currentVersion* @param {*} type*/function getPreReleaseVersion(currentVersion, type) {let {major, minor, patch, preReleaseLabel, preReleaseVersion} =currentVersion;switch (type) {case 'prepatch':patch += 1;return `${major}.${minor}.${patch}-0`;case 'preminor':minor += 1;return `${major}.${minor}.0-0`;case 'premajor':major += 1;return `${major}.0.0-0`;case 'prerelease':if (isPreRelease(`${major}.${minor}.${patch}`)) {preReleaseVersion = preReleaseVersion || 0;return `${major}.${minor}.${patch}-${preReleaseLabel || 'beta'}.${preReleaseVersion + 1}`;} else {return `${major}.${minor}.${patch}-beta.0`;}default:throw new Error(`❌ 不支持的预发布版本类型: ${type}`);}}/*** 获取最新版本号* @returns Promise*/async function getLatestVersion() {try {const {stdout} = await exec(`npm show ${packageName} version`);const latestVersion = stdout.trim().replace(/^v/, ''); // 删除可能存在的前导 vreturn latestVersion;} catch (error) {console.error(`❌ 获取最新版本失败: ${error.message}`);throw error; // 抛出错误,以便可以在调用此函数的地方捕获并处理}}/*** 更新版本号* @param {*} newVersion*/function updateVersion(newVersion) {packageJson.version = newVersion;fs.writeFileSync(packageJsonPath, JSON.stringify(packageJson, null, 2));console.log(`✅ 版本号已更新为 ${newVersion}`);}/*** 确保用户已登录npm* @returns {Promise<string>} 返回已登录用户的名称或抛出错误*/async function ensureNpmLoggedIn() {try {const {stdout} = await exec('npm whoami');console.log(`✅ 检测到您已作为${stdout.trim()}登录到npm`);return stdout.trim();} catch (error) {console.error('❌ 您似乎还没有登录到npm。请登录后继续。');const answers = await inquirer.prompt([{type: 'input',name: 'username',message: '请输入您的npm用户名:',},{type: 'password',name: 'password',message: '请输入您的npm密码:',},{type: 'input',name: 'email',message: '请输入您的npm邮箱地址:',},]);// 以下操作依赖于能够自动化的输入命令到npm login(在这个假设下编写)// 实际操作中这可能需要特殊处理,例如通过node-pty实现自动输入const {stdout: loginStdout} = await exec(`echo "${answers.username}\n${answers.password}\n${answers.email}\n" | npm login`,);console.log('✅ 登录输出流loginStdout', loginStdout);return answers.username;}}/*** 异步地发布到npm* @returns {Promise<void>}*/async function publishToNpm() {console.log('🚀🚀🚀 正在发布到 npm...');try {// 这里可以添加对newVersion的使用,例如修改package.json中的版本号// 如果newVersion参数确实需要被用于发布特定版本,这里应该加入对版本号处理的逻辑// 例如使用 npm version 命令来更新项目的版本号const {stdout, stderr} = await exec('npm publish');if (stderr) {console.log(`✅ 发布输出流stderr: ${stderr}`);}console.log(`🎉🎉🎉 npm包发布成功: ${stdout}`);} catch (error) {console.error(`❌ 发布失败: ${error.message}`);throw error; // 抛出错误以供调用方处理}}/*** 标记tag* @param {*} newVersion*/function gitOperations(newVersion) {try {process.chdir(projectRootPath); // Change the current working directory to project root// 获取当前分支名称const branchName = execSync('git rev-parse --abbrev-ref HEAD').toString().trim();// 检查是否有设置 upstream(远程跟踪分支)let setUpstream = false;try {execSync(`git rev-parse --abbrev-ref --symbolic-full-name @{u}`);} catch (error) {// 如果没有设置 upstream,为远程的同名分支设置 upstreamconst remoteBranchExists = execSync(`git ls-remote --heads origin ${branchName}`,).toString().trim();if (remoteBranchExists) {execSync(`git branch --set-upstream-to=origin/${branchName}`);} else {console.error(`❌ 远程分支 'origin/${branchName}' 不存在,无法设置 upstream。`,);return;}setUpstream = true;}execSync(`git add .`, {stdio: 'inherit'});execSync(`git commit -m "chore(release): ${newVersion}"`, {stdio: 'inherit',});execSync(`git tag v${newVersion}`, {stdio: 'inherit'});// 推送改动到远程分支execSync(`git push`, {stdio: 'inherit'});if (setUpstream) {// 如果之前没有 upstream,并且我们为其设置了 upstream,现在也推送它execSync(`git push --set-upstream origin ${branchName}`, {stdio: 'inherit',});}// 推送tag到远程execSync(`git push origin v${newVersion}`, {stdio: 'inherit'});console.log(`✅ Git tag v${newVersion} 已标记`);} catch (error) {console.error(`❌ Git 操作失败: ${error.message}`);}}/*** 设置npm的registry到指定的URL,并返回旧的registry* @returns {Promise<string>} 当成功时返回旧的registry URL*/async function setNpmRegistry() {try {const {stdout: getRegistryStdout} = await exec(`npm config get registry`);const oldNpmRegistry = getRegistryStdout.trim();const NPM_REGISTRY_URL = 'https://registry.npmjs.org/';await exec(`npm config set registry ${NPM_REGISTRY_URL}`);console.log(`✅ npm registry已设置为: ${NPM_REGISTRY_URL}`);return oldNpmRegistry; // 返回旧的registry,以便后续可以恢复} catch (error) {if (error.stdout) {console.error(`❌ 设置npm registry stdout输出流: ${error.stdout}`);}if (error.stderr) {console.error(`❌ 设置npm registry stderr出错: ${error.stderr}`);}console.error(`❌ 设置npm registry中发生错误: ${error.message}`);throw error; // 抛出错误以供调用者处理}}/*** 恢复npm的registry为旧的URL* @returns {Promise<void>}*/async function restoreNpmRegistry(oldNpmRegistry) {if (oldNpmRegistry) {try {await exec(`npm config set registry ${oldNpmRegistry}`);console.log(`✅ npm registry已恢复为: ${oldNpmRegistry}`);} catch (error) {if (error.stdout) {console.error(`✅ 恢复npm registry输出流: ${error.stdout}`);}if (error.stderr) {console.error(`❌ 恢复npm registry出错: ${error.stderr}`);}console.error(`❌ 恢复npm registry中发生错误: ${error.message}`);throw error; // 抛出错误以供调用方处理}} else {console.error(`❌ 未找到旧的npm registry,无法恢复。`);throw new Error(`❌ 未找到旧的npm registry,无法恢复。`);}}/*** 命令行显示逻辑* @param {*} latestVersion*/async function displayOptions(latestVersion) {console.log('✅ 发包脚本启动【自动更新版本号、自动发布到npm】');console.log('!!! 使用前请确保仓库内已经是可发布状态');const currentVersion = parseVersion(latestVersion);const choices = [{name: `Major【大版本】 (${parseInt(currentVersion.major) + 1}.0.0)`,value: 'major',},{name: `Minor【小版本】 (${currentVersion.major}.${parseInt(currentVersion.minor) + 1}.0)`,value: 'minor',},{name: `Patch【修订版本】 (${currentVersion.major}.${currentVersion.minor}.${parseInt(currentVersion.patch) + 1})`,value: 'patch',},{name: `Prepatch【预发修订版本】`, value: 'prepatch'},{name: `Preminor【预发小版本】`, value: 'preminor'},{name: `Premajor【预发大版本】`, value: 'premajor'},{name: `Prerelease【预发版】`, value: 'prerelease'},{name: `Specific version【指定版本】`, value: 'specific'},];inquirer.prompt([{type: 'list',name: 'releaseType',message: '请选择版本号的更新类型:',choices: choices,},{type: 'input',name: 'specificVersion',message: '输入具体的版本号:',when: (answers) => answers.releaseType === 'specific',validate: (input) =>/\d+\.\d+\.\d+(-\w+\.\d+)?/.test(input) ||'版本号必须符合语义化版本控制规范。',},]).then(async (answers) => {let newVersion = '';// 指定版本号if (answers.releaseType === 'specific') {newVersion = answers.specificVersion;} else if (['major', 'minor', 'patch'].includes(answers.releaseType)) {// 非预发版本currentVersion[answers.releaseType]++;newVersion = `${currentVersion.major}.${currentVersion.minor}.${currentVersion.patch}`;} else {// 预发布版本newVersion = getPreReleaseVersion(currentVersion, answers.releaseType);}// 更新版本号updateVersion(newVersion);// git增加tag并提交gitOperations(newVersion);// 设置npm源const oldRegistryUrl = await setNpmRegistry();// 检测是否已经登录npmawait ensureNpmLoggedIn();// 发布到npmawait publishToNpm();// 恢复npm源await restoreNpmRegistry(oldRegistryUrl);});}/*** 主函数入口*/async function main() {try {const latestVersion = await getLatestVersion();await displayOptions(latestVersion);} catch (error) {console.error('❌ 发生错误:', error);}}main();
🍎 推荐阅读
面试手写系列
react实现原理系列
- 【react原理实践】使用babel手搓探索下jsx的原理
- 【喂饭式调试react源码】上手调试源码探究jsx原理
- 【上手调试源码系列】图解react几个核心包之间的关联
- 【上手调试源码系列】react启动流程,其实就是创建三大全局对象
其他
🍋 写在最后
如果您看到这里了,并且觉得这篇文章对您有所帮助,希望您能够点赞👍和收藏⭐支持一下作者🙇🙇🙇,感谢🍺🍺!如果文中有任何不准确之处,也欢迎您指正,共同进步。感谢您的阅读,期待您的点赞👍和收藏⭐!
感兴趣的同学可以关注下我的公众号ObjectX前端实验室
🌟 少走弯路 | ObjectX前端实验室 🛠️「精选资源|实战经验|技术洞见」