
虚拟列表的几种实现方式
虚拟列表的几种实现方式
🥑 实现效果&代码
定高
不定高
动态高度
工程化
本系列是一个从0到1的实现过程,如果您有耐心跟着实现,您可以实现一个完整的react18 + ts5 + webpack5 + 代码质量&代码风格检测&自动修复 + storybook8 + rollup + git action实现的一个完整的组件库模板项目。如果您不打算自己配置,也可以直接clone组件库仓库切换到rollup_comp分支即是完整的项目,当前实现已经足够个人使用,后续我们会新增webpack5优化、按需加载组件、实现一些常见的组件封装:包括但不限于拖拽排序、瀑布流、穿梭框、弹窗等
- 【前端工程化】项目搭建篇-项目初始化&prettier、eslint、stylelint、lint-staged、husky
- 【前端工程化】项目搭建篇-配置changelog、webpack5打包
- 【前端工程化】项目搭建篇-引入react、ts、babel解析es6+、配置css module
- 【前端工程化】组件库搭建篇-引入storybook、rollup打包组件、本地测试组件库
- 【前端工程化】包管理器篇-三大包管理器、npm工程管理、npm发布流程
- 【前端工程化】自动化篇-Github Action基本使用、自动部署组件库文档、github3D指标统计
- 【前端工程化】自动化篇-手写脚本一键自动tag、发包、引导登录npm
常见组件实现
一、虚拟列表
什么是虚拟列表
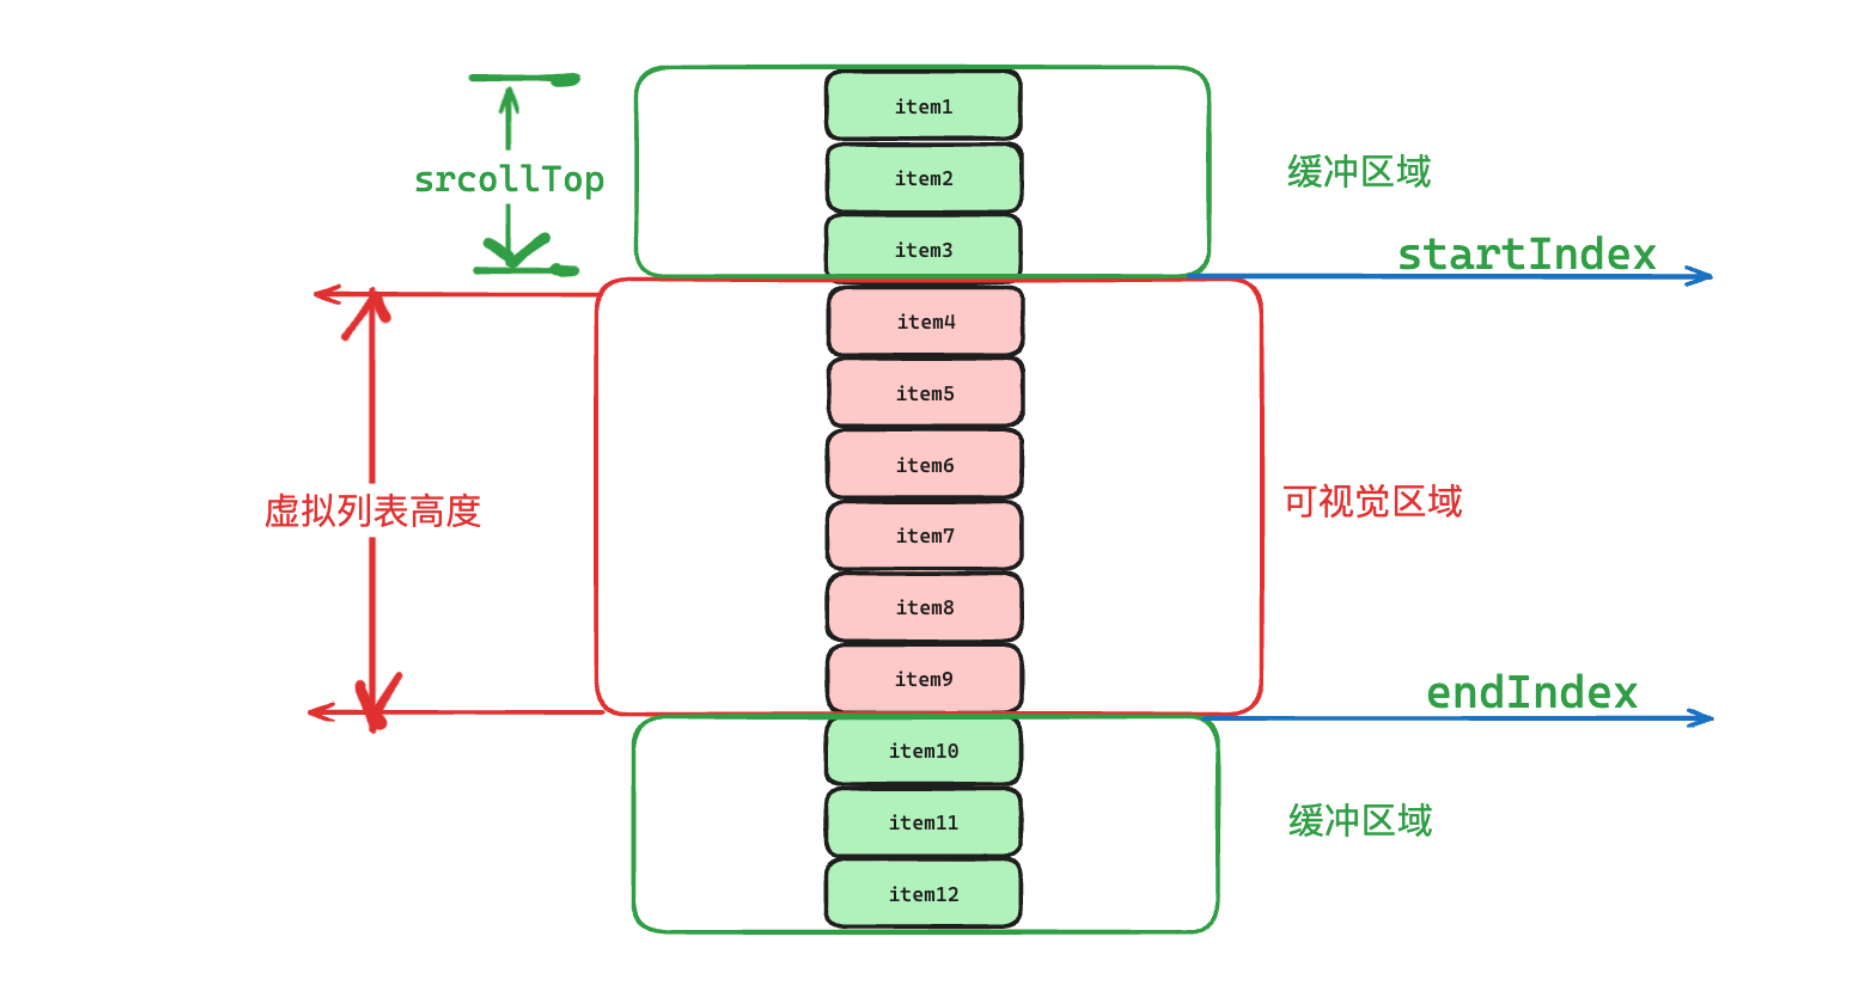
虚拟列表其实是按需显示的一种实现,即只对可见区域进行渲染,对非可见区域中的数据不渲染或部分渲染,也就是设置缓冲区,从而达到极高的渲染性能。如下图所示,未滚动的时候上缓冲区是没有的,虚拟列表有三种情况
- 定高虚拟列表,每一项的高度固定,可以很容易计算
- 不定高虚拟列表,每一项的高度是不固定的,但是我们知道整个列表的高度数组
- 动态高度虚拟列表,每一项的高度在渲染时确认
对于所有虚拟列表而言,我们的实现考虑的都是如何计算出可视区域的节点索引范围,即[startIndex, endIndex],然后加上缓冲区的大小,将此范围内的节点渲染到容器中,我们最根本的目的是计算起始索引startIndex和终止索引endIndex。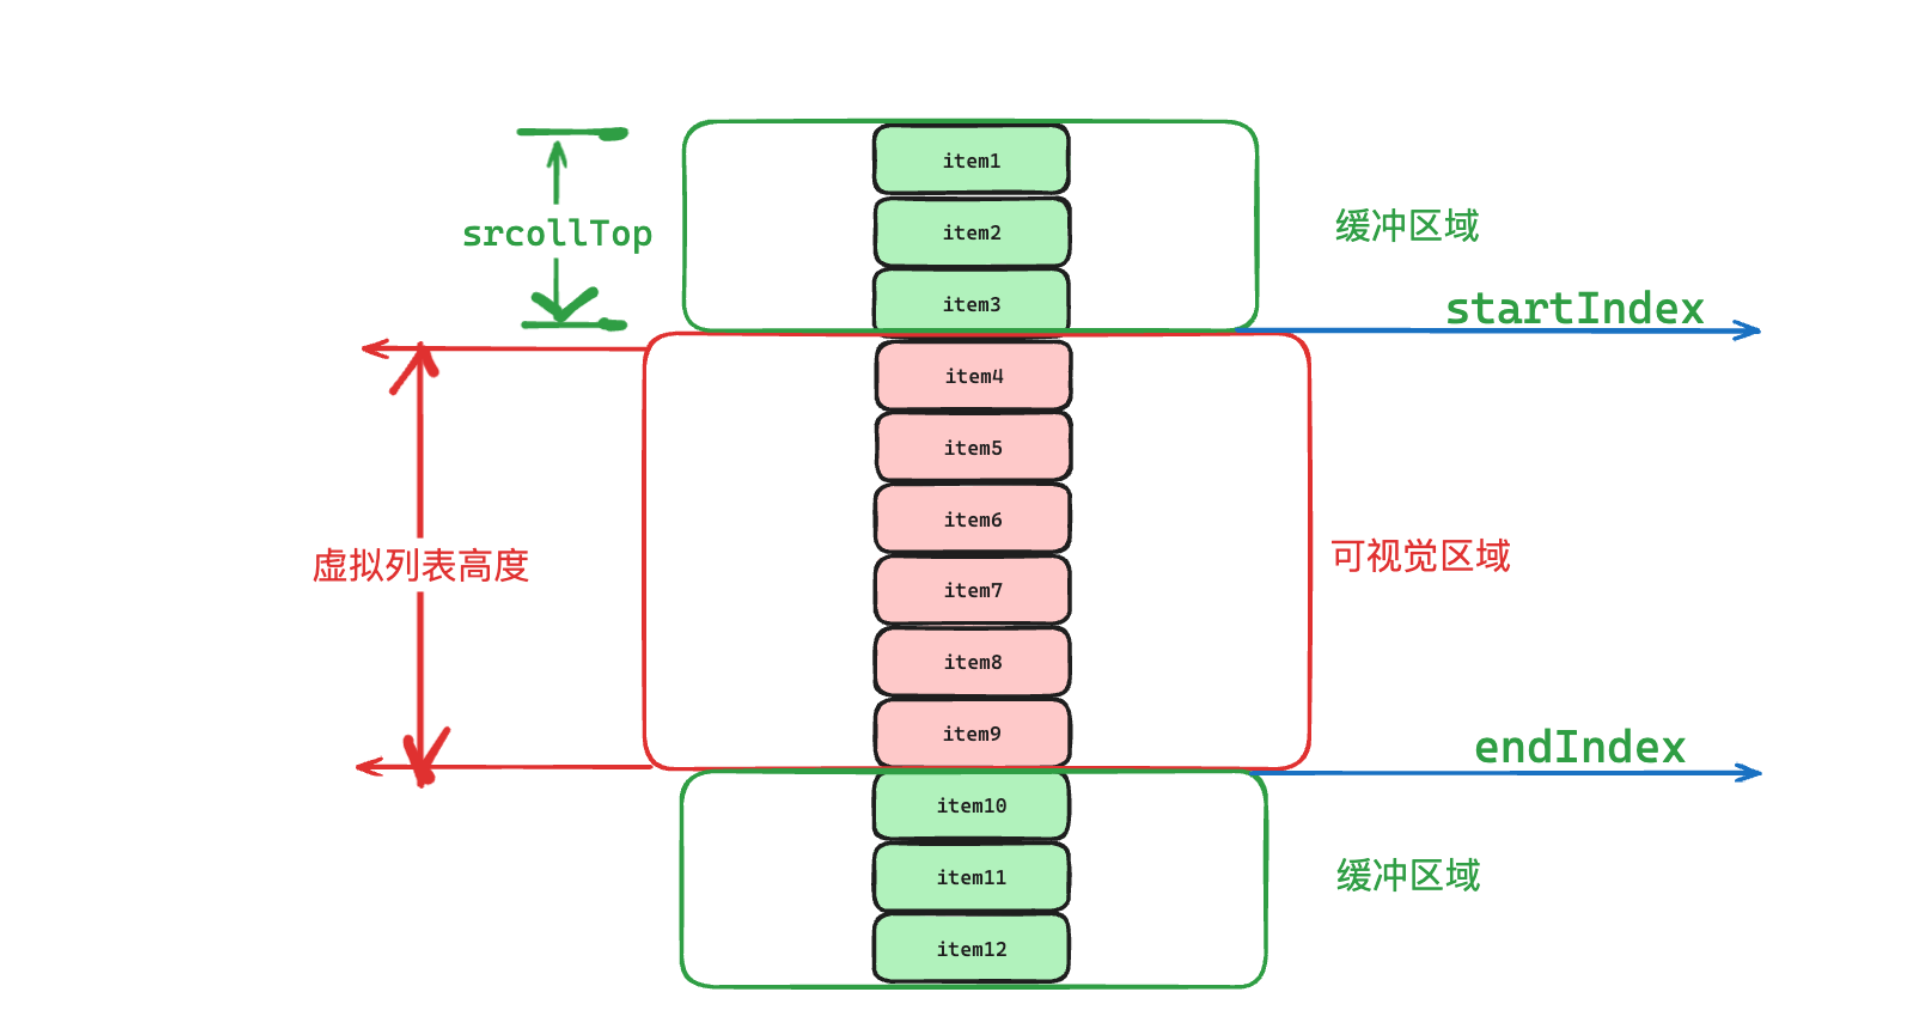
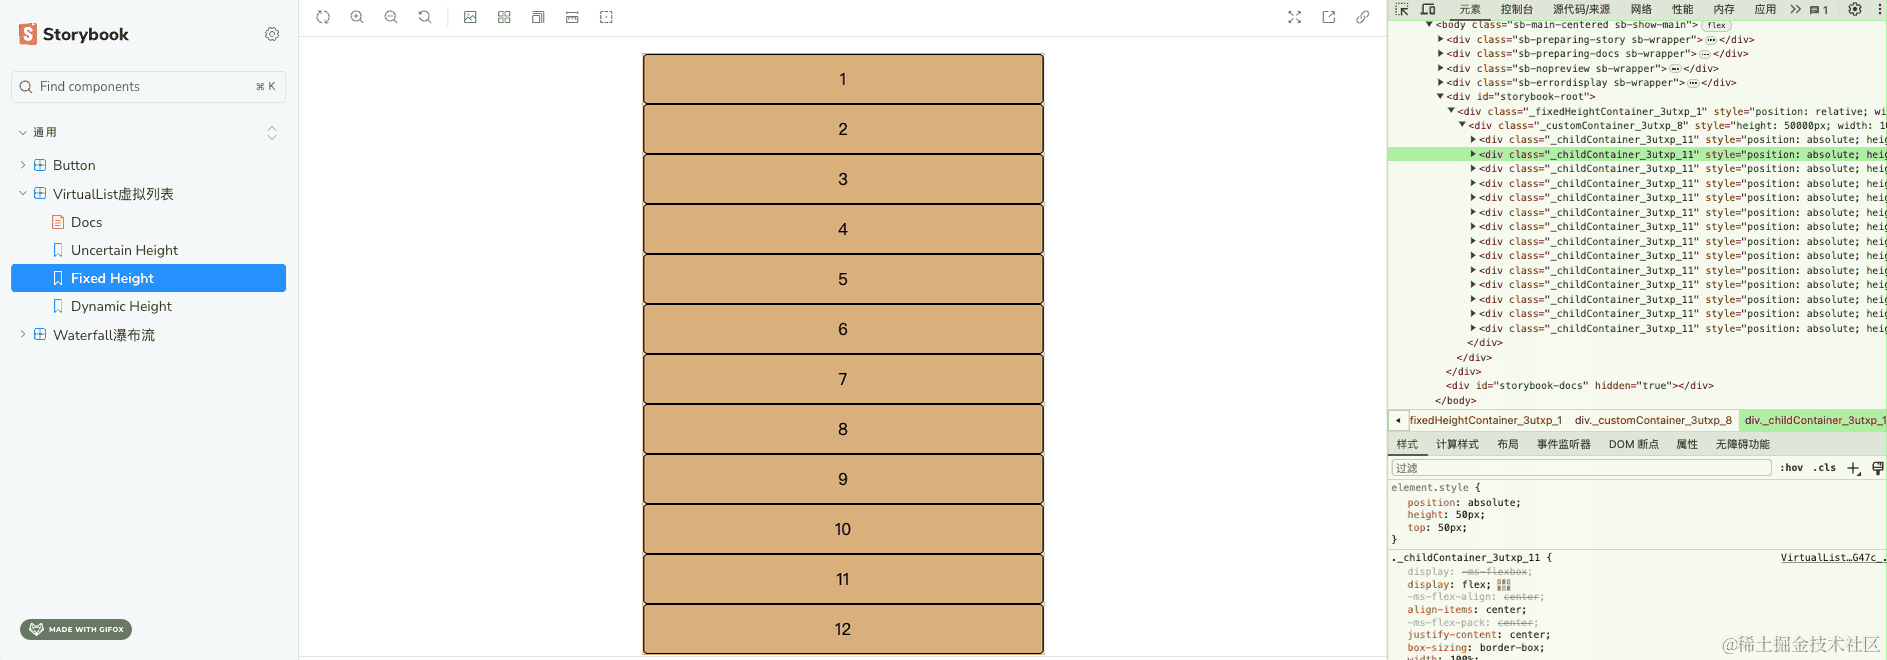
1.定高虚拟列表
图示
原理
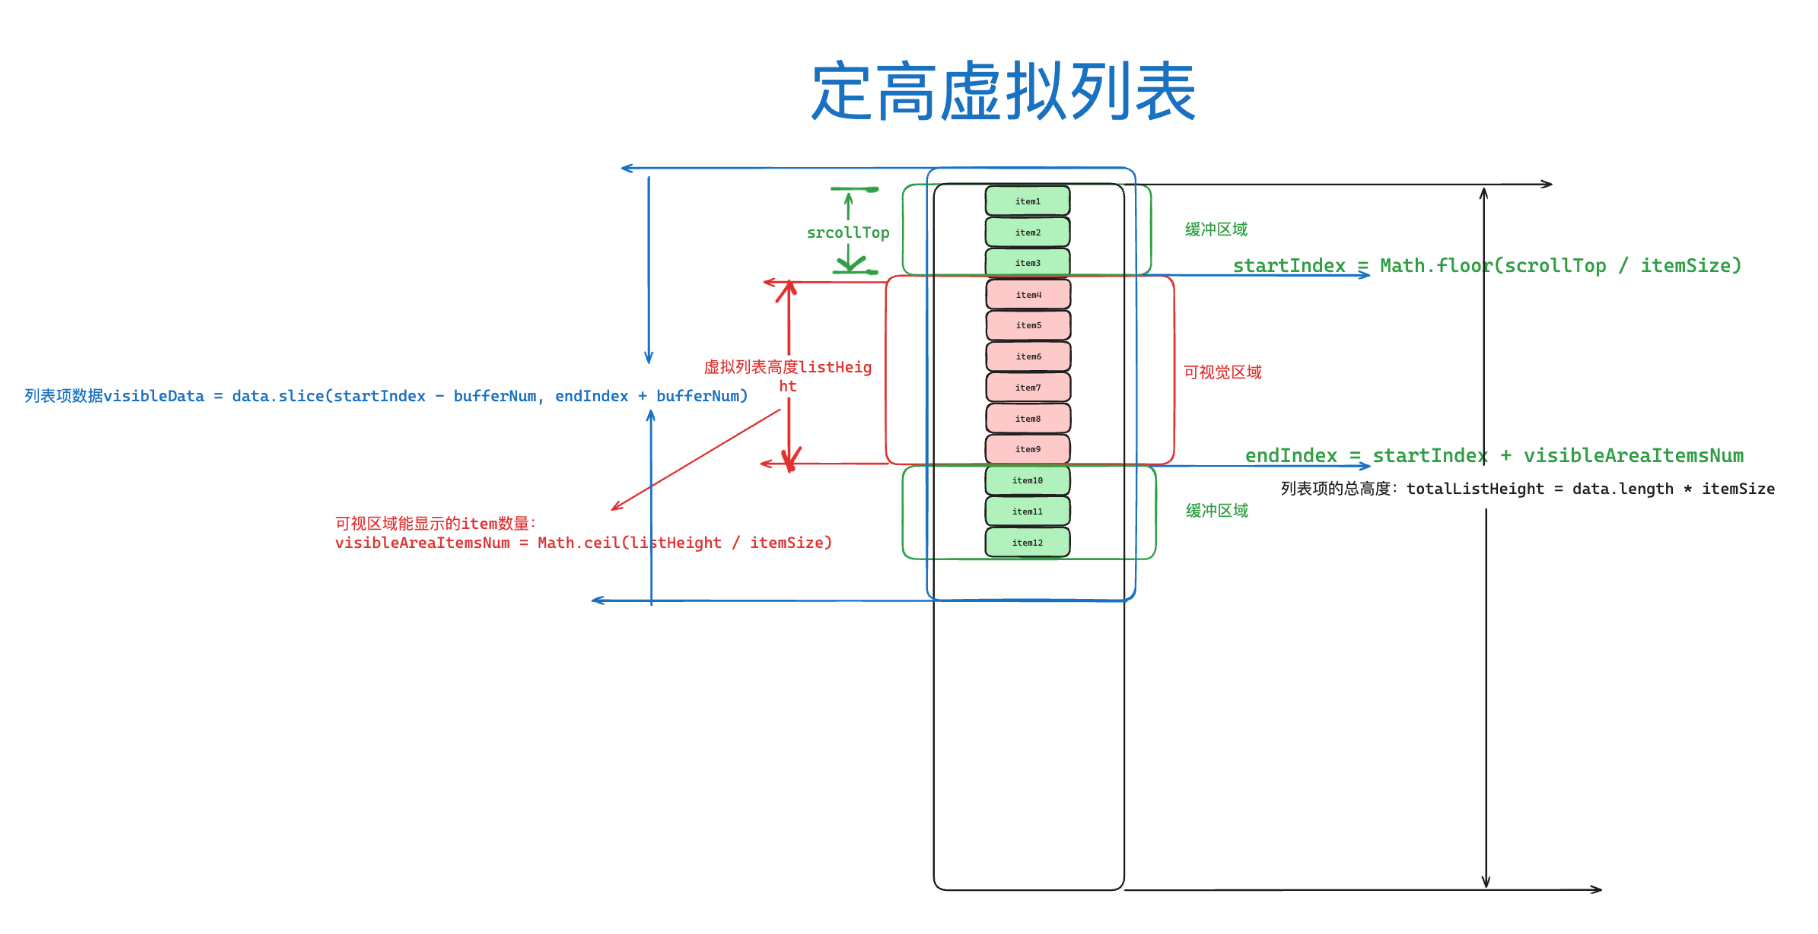
定高是最简单的,itemSize值是固定的我们可以直接求出我们需要的几个值,即如下几个值:
- 列表总高度: 列表总高度是用于显示滚动条的
totalListHeight = data.length * itemSize
- 可视区域能显示的item数量: 主要是用于,在计算出
startIndex后计算出endIndex
visibleAreaItemsNum = Math.ceil(listHeight / itemSize)
- 数据的起始索引: 由于高度固定,起始索引可以根据滚动掉的高度
scrollTop直接计算出
startIndex = Math.floor(scrollTop / itemSize)
- 数据的结束索引: 根据起始索引和可视区域显示的item数,我们可以直接计算出结束索引
endIndex = startIndex + visibleAreaItemsNum
- 列表显示数据为,加上了缓冲区域
visibleData = data.slice(startIndex - bufferNum, endIndex + bufferNum)
实现
虚拟列表的基本结构
fixedHeightContainer容器自定义宽高,contentContainer容器用于撑起滚动条
// 定高const fixedHeightRender = (options: VirtualListProps) => {const {itemHeight = 50, itemSumCount = 1000, listWidth, listHeight} = options;// 记录滚动掉的高度const [scrollTop, setScrollTop] = useState<number>(0);// 自定义的列表高度const customContainerStyle: CSSProperties = {position: 'relative',width: listWidth ?? 400,height: listHeight ?? 600,};// 1000个元素撑起盒子的实际高度const contentStyle: CSSProperties = {height: itemHeight * itemSumCount,width: '100%',};// 当触发滚动就重新计算const scrollHandle = (event: React.UIEvent<HTMLElement>) => {const {scrollTop} = event.currentTarget;setScrollTop(scrollTop);};return (<divclassName={style.fixedHeightContainer}style={customContainerStyle}onScroll={scrollHandle}><div className={style.contentContainer} style={contentStyle}>{getCurShowChild(options)}</div></div>);};
样式
.fixedHeightContainer {display: block;width: 400px;height: 600px;overflow: auto;border: 1px solid tan;.contentContainer {display: block;}}
实现核心方法
解释都在注释中,就是实现原理中的描述,纯计算
const getCurShowChild = (options: VirtualListProps) => {const {itemHeight = 50, itemSumCount = 1000, listHeight = 600} = options;// 可视区起始索引const startIndex = Math.floor(scrollTop / itemHeight);// 上缓冲区起始索引const finialStartIndex = Math.max(0, startIndex - 2);// 可视区能展示的元素的最大个数const numVisible = Math.ceil(listHeight / itemHeight);// 下缓冲区结束索引const finialEndIndex = Math.min(itemSumCount, startIndex + numVisible + 2);const items = [];// 根据上面计算的索引值,不断添加元素给containerfor (let i = finialStartIndex; i < finialEndIndex; i++) {items.push(ChildItem({childHeight: itemHeight,childIndex: i,}),);}return items;};
效果
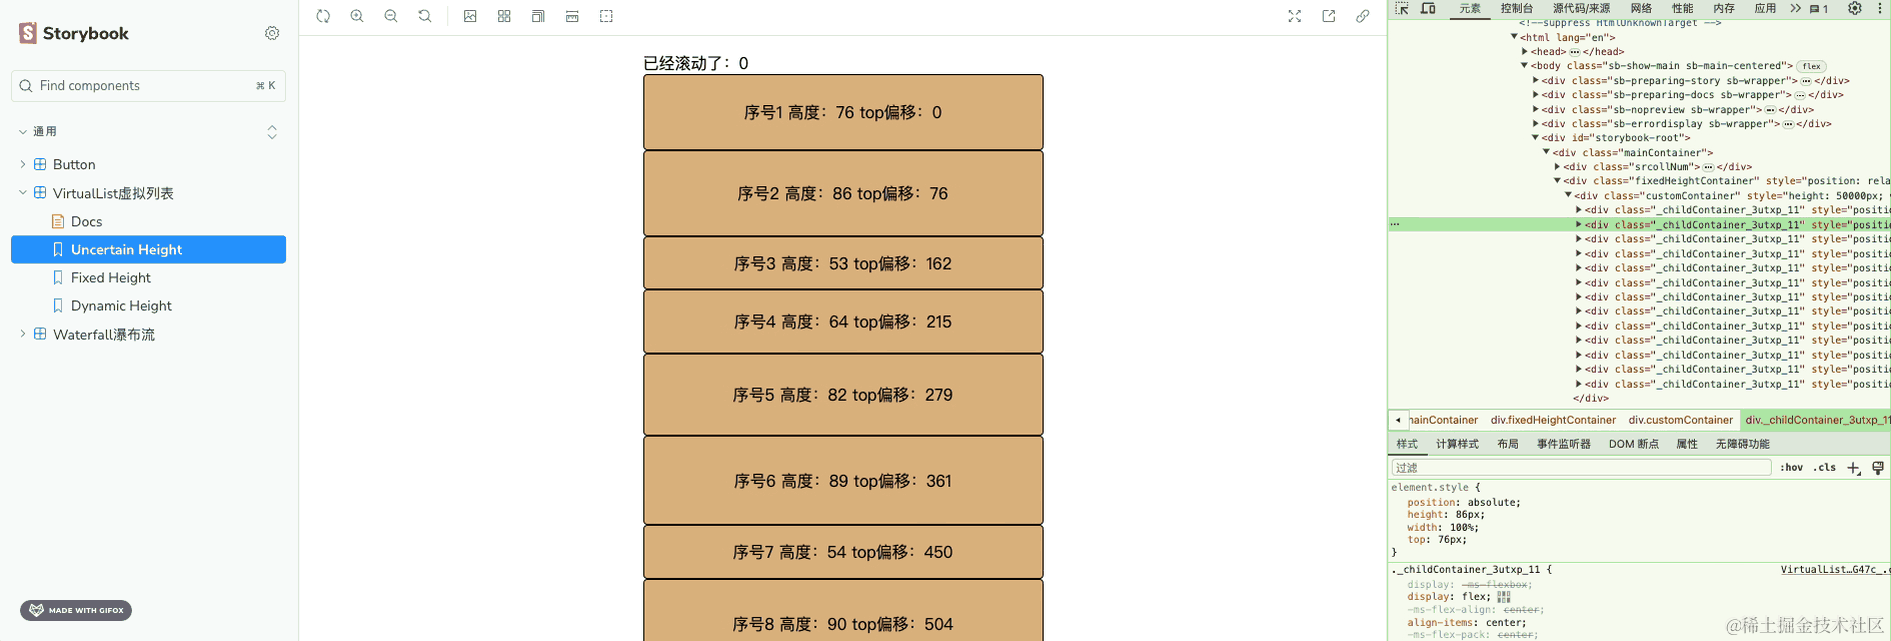
2.不定高虚拟列表
图示
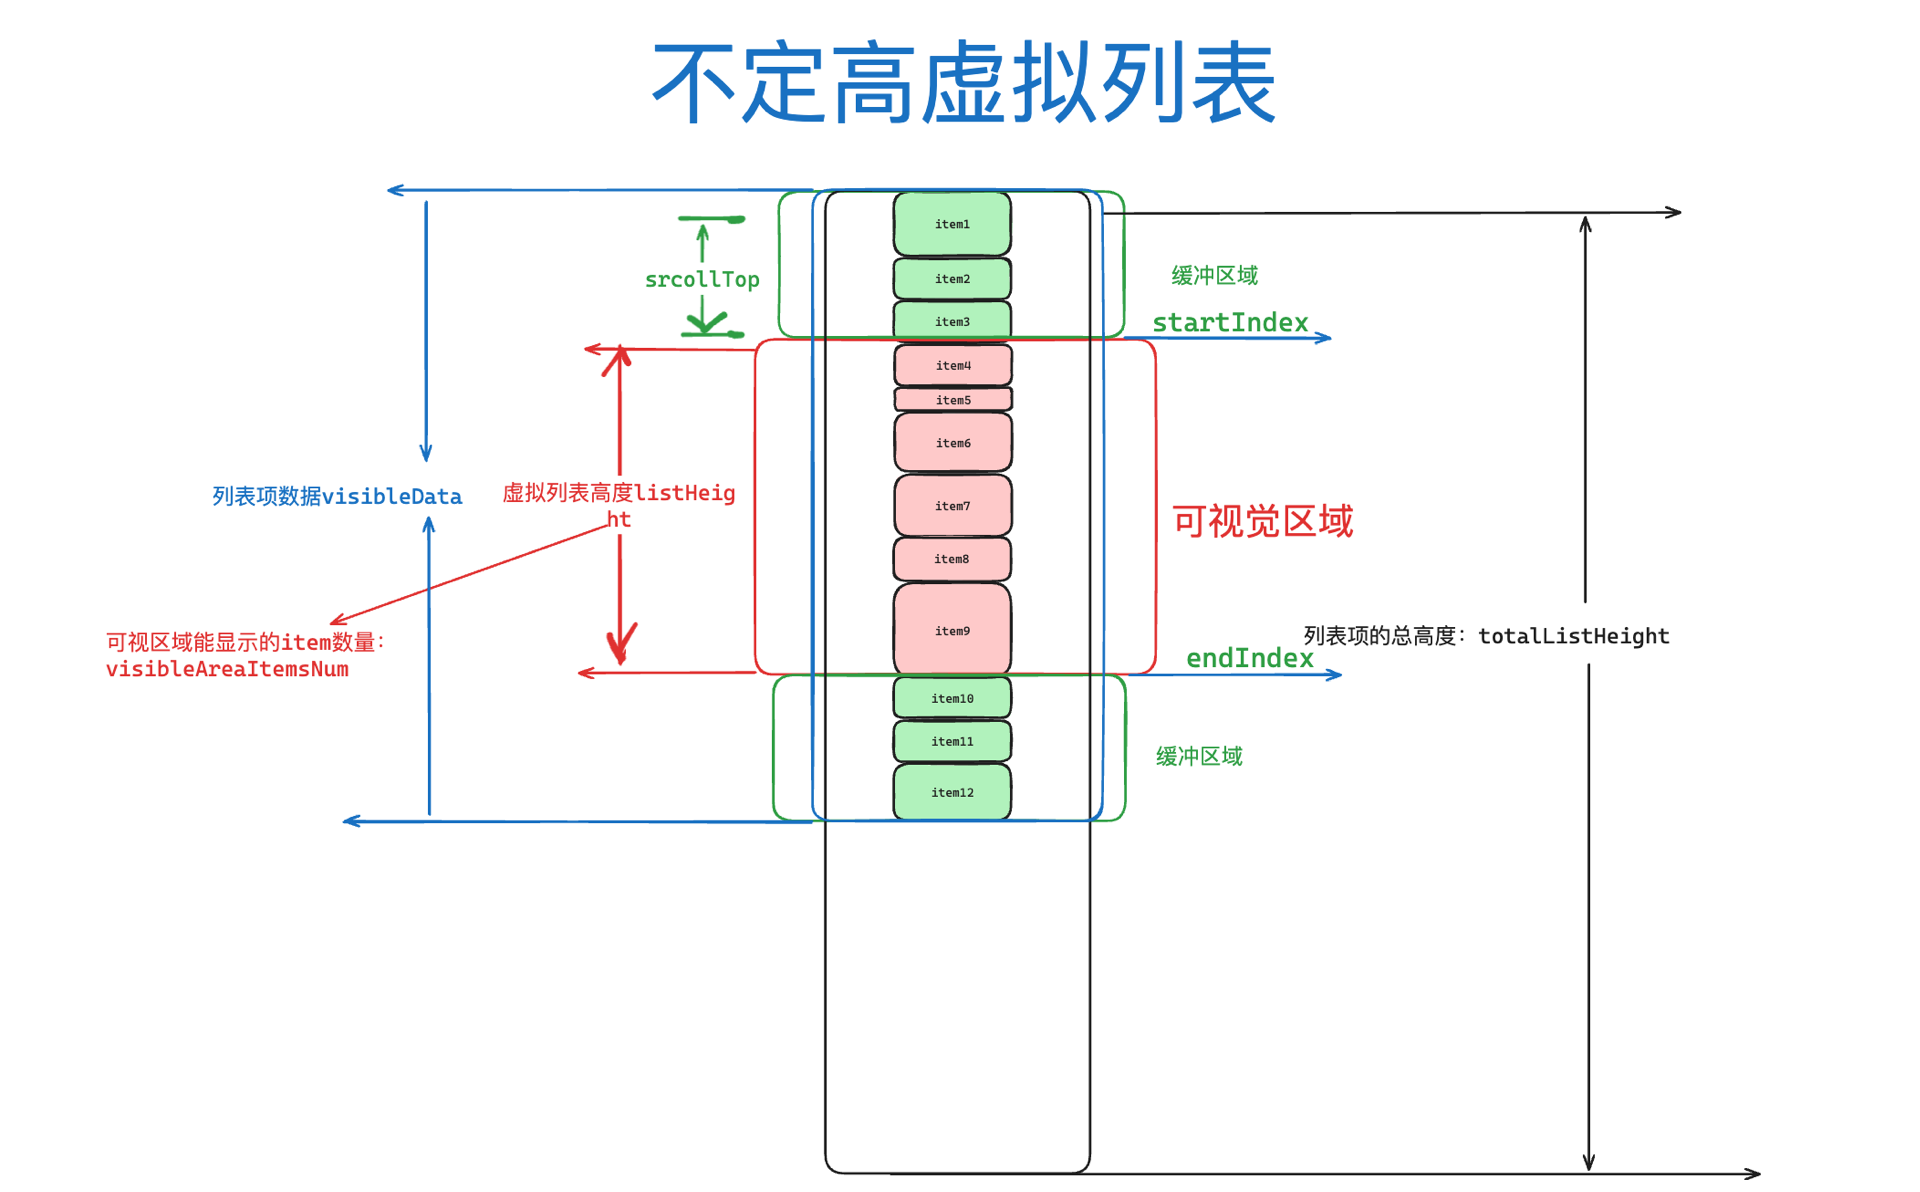
因为每一项的高度不固定,所以我们需要的startIndex和visibleAreaItemsNum无法直接根据项目高度直接计算出来,也就意味着endIndex我们也计算不出来
原理
我们有什么?
- 一个包含所有容器高度的高度列表?
知道这个能做什么?
- 可以知道总容器的高度
我们需要什么?
- 第一:可视区域:我们的目标仍然是如何计算出可视区域的节点索引范围,即
[startIndex, endIndex],然后加上缓冲区的大小,将此范围内的节点渲染到容器中,我们最根本的目的是计算起始索引startIndex和终止索引endIndex。 - 第二:容器的总高度:我们无需精确计算全部数据容器到底有多高,需要需要这个是、是因为需要滚动条,滚动区域。我们可以简单给出一个粗略的高度
如何计算我们可以设计一个数据结构保存已经展示过的item的高度,偏移值信息如下,这样我们就可以计算出起始索引,终止索引了
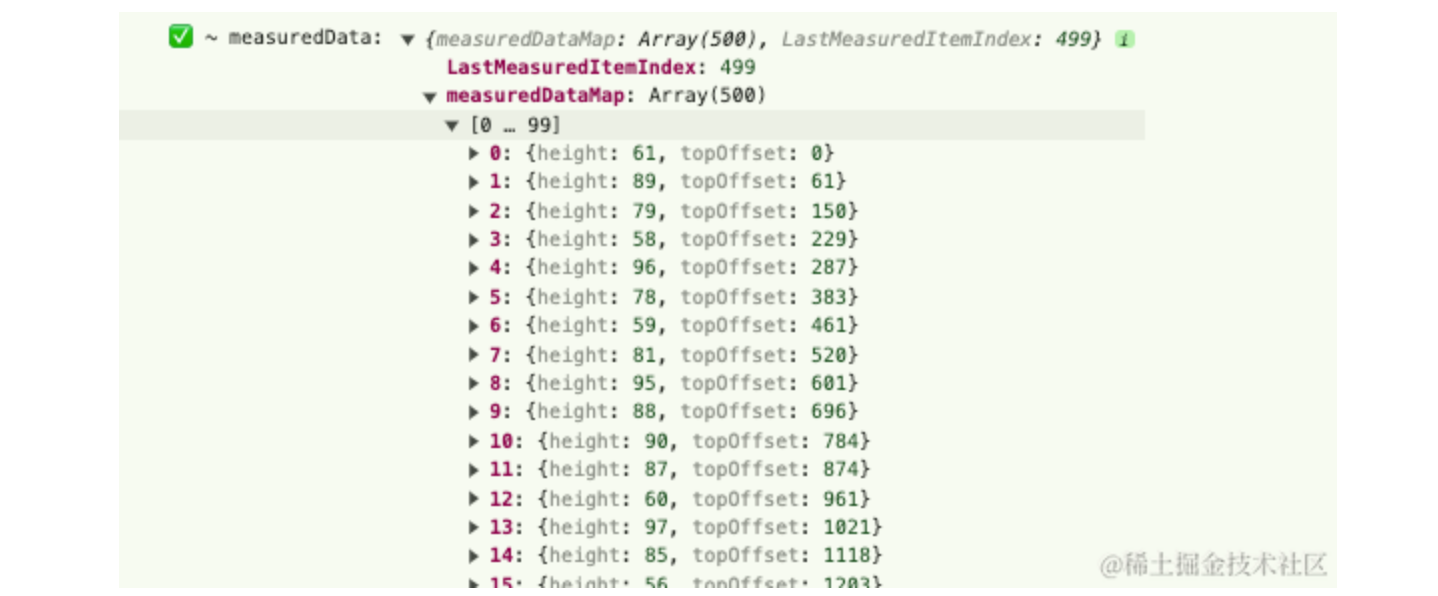
// 每一项的数据结构interface MeasuredDataMap {height: number;topOffset: number;}// 缓存映射的数据结构interface MeasuredDataList {measuredDataMap: MeasuredDataMap[];// 当前已经记录的最后一个indexLastMeasuredItemIndex: number;}const measuredData: MeasuredDataList = {measuredDataMap: [],LastMeasuredItemIndex: -1,};
- 预测列表总高度: 我们无需获取精确的全部数量的容器高度,仅需要通过当前已记录的总高度+当前未记录的总高度,预估列表总高度
const totalEstimatedHeight =measuredHeight + unMeasuredItemsCount * defaultItemHeight;
- 最大索引偏移值: 现在我们无法通过列表项高度直接算出,但是我们可以通过起始项的偏移值加上列表的总高度,计算出最大偏移值,从而计算出结束索引。
const maxOffset = startItem.topOffset + listHeight;
- 数据的起始索引: 我们可以通过二分法在已经记录的项中找到
topOffset >= srcollTop的项就是第一项
const getStartIndex = (options: VirtualListProps, scrollOffset: number) => {const {itemSumCount = 1000} = options;let low = 0;let high = itemSumCount - 1;while (low <= high) {const mid = Math.floor((low + high) / 2);const currentOffset = getItemMetaData(mid).topOffset;if (currentOffset === scrollOffset) {return mid;} else if (currentOffset < scrollOffset) {low = mid + 1;} else {high = mid - 1;}}return low;};
- 数据的结束索引: 从
startItem一直遍历加上每一项的height,直到topOffset >= maxOffset,就是结束项的索引
// 查找终止索引:通过起始item的topOffset+自定义的listHeight可以计算出当前能显示的最大偏移值maxOffset// 从startItem一直遍历加上height,直到offset >= maxOffsetconst getEndIndex = (options: VirtualListProps, startIndex: number) => {const {listHeight = 600, itemSumCount = 1000} = options;const startItem = getItemMetaData(startIndex);const maxOffset = startItem.topOffset + listHeight;let offset = startItem.topOffset + startItem.height;let endIndex = startIndex;while (offset <= maxOffset && endIndex < itemSumCount - 1) {endIndex++;const currentItem = getItemMetaData(endIndex);offset += currentItem.height;}return endIndex;};
实现
定义缓存数据结构
// 使用useRef保存itemHeightList,确保在组件生命周期内不变const itemHeightListRef = useRef<number[]>(new Array(itemSumCount).fill(0).map(() => {return itemHeight + Math.round(Math.random() * itemHeight);}),);const getItemHeightByIndex = (index: number) =>itemHeightListRef.current[index];const measuredData: MeasuredDataList = {measuredDataMap: [],LastMeasuredItemIndex: -1,};
获取每一项的数据
根据LastMeasuredItemIndex
- 如果小于
LastMeasuredItemIndex的都是被缓存过的项,直接获取 - 如果大于
LastMeasuredItemIndex则是未被缓存过的项,从LastMeasuredItemIndex开始,遍历到index,将遍历的所有项的height相加,即为当前项的index
// LastMeasuredItemIndex是已经被记录的滚动到的最大索引,如果是大于LastMeasuredItemIndex,// 则可以通过一项一项的相加,加到index就是当前项的最大偏移值const getItemMetaData = (index: number) => {const {measuredDataMap, LastMeasuredItemIndex} = measuredData;if (index > LastMeasuredItemIndex) {let topOffset = 0;// 先获取到最底部新增的一项的topOffsetif (LastMeasuredItemIndex >= 0) {const lastMeasuredItem = measuredDataMap[LastMeasuredItemIndex];topOffset += lastMeasuredItem.topOffset + lastMeasuredItem.height;}// 遍历记录,直到indexfor (let i = LastMeasuredItemIndex + 1; i <= index; i++) {const currentItemSize = getItemHeightByIndex(i);measuredDataMap[i] = {height: currentItemSize, topOffset};topOffset += currentItemSize;}measuredData.LastMeasuredItemIndex = index;}return measuredDataMap[index];};
获取开始索引
查找起始索引,从记录的数据结构中查找,第一项就是topOffset >= srcollTop这里我们用二分法进行优化
const getStartIndex = (options: VirtualListProps, scrollOffset: number) => {const {itemSumCount = 1000} = options;let low = 0;let high = itemSumCount - 1;while (low <= high) {const mid = Math.floor((low + high) / 2);const currentOffset = getItemMetaData(mid).topOffset;if (currentOffset === scrollOffset) {return mid;} else if (currentOffset < scrollOffset) {low = mid + 1;} else {high = mid - 1;}}return low;};
获取结束索引
我们虽然不知道可视区能显示多少个列表项,但是我们可以根据第一个的偏移值加上虚拟列表的高度,计算出最大偏移值,这样我们就可以查找终止索引:通过起始item的topOffset+自定义的listHeight可以计算出当前能显示的最大偏移值maxOffset,从startItem一直遍历加上height,直到offset >= maxOffset就是结束索引的位置
const getEndIndex = (options: VirtualListProps, startIndex: number) => {const {listHeight = 600, itemSumCount = 1000} = options;const startItem = getItemMetaData(startIndex);const maxOffset = startItem.topOffset + listHeight;let offset = startItem.topOffset + startItem.height;let endIndex = startIndex;while (offset <= maxOffset && endIndex < itemSumCount - 1) {endIndex++;const currentItem = getItemMetaData(endIndex);offset += currentItem.height;}return endIndex;};
可视区项目获取
// 获取当前可现实的范围const getChildShowRange = (options: VirtualListProps,scrollOffset: number,) => {const {itemSumCount = 1000, bufferNum = 4} = options;const startIndex = getStartIndex(options, scrollOffset);const endIndex = getEndIndex(options, startIndex);return {bufferStartIndex: Math.max(0, startIndex - bufferNum),bufferEndIndex: Math.min(itemSumCount - 1, endIndex + bufferNum),startIndex,endIndex,};};const getCurShowChild = (options: VirtualListProps, scrollTop: number) => {const items = [];const {bufferStartIndex, bufferEndIndex} = getChildShowRange(options,scrollTop,);for (let i = bufferStartIndex; i <= bufferEndIndex; i++) {const item = getItemMetaData(i);const itemStyle: CSSProperties = {position: 'absolute',height: item.height,width: '100%',top: item.topOffset,};items.push(<ChildItem key={i} childIndex={i} itemStyle={itemStyle} />);}console.log('✅ ~ measuredData:', measuredData);return items;};
效果
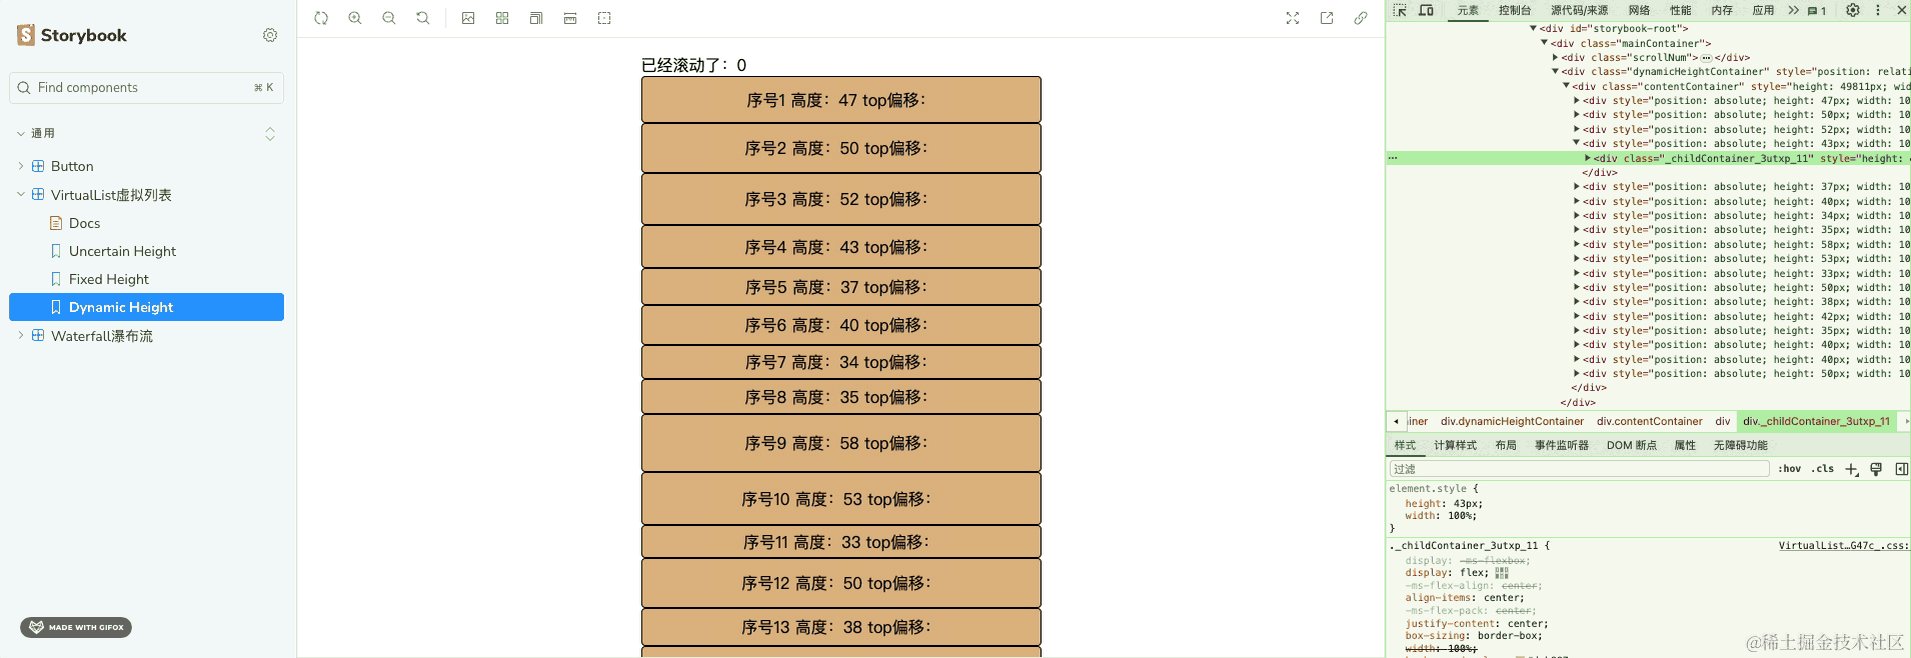
3.动态高度虚拟列表
图示
大部分原理是跟不定高一致的,区别是我们连一个高度列表都没有,无法知道每一项的高度是多少,每一项的高度是在渲染时确定的,为了防止抖动,我们设置了一个默认高度。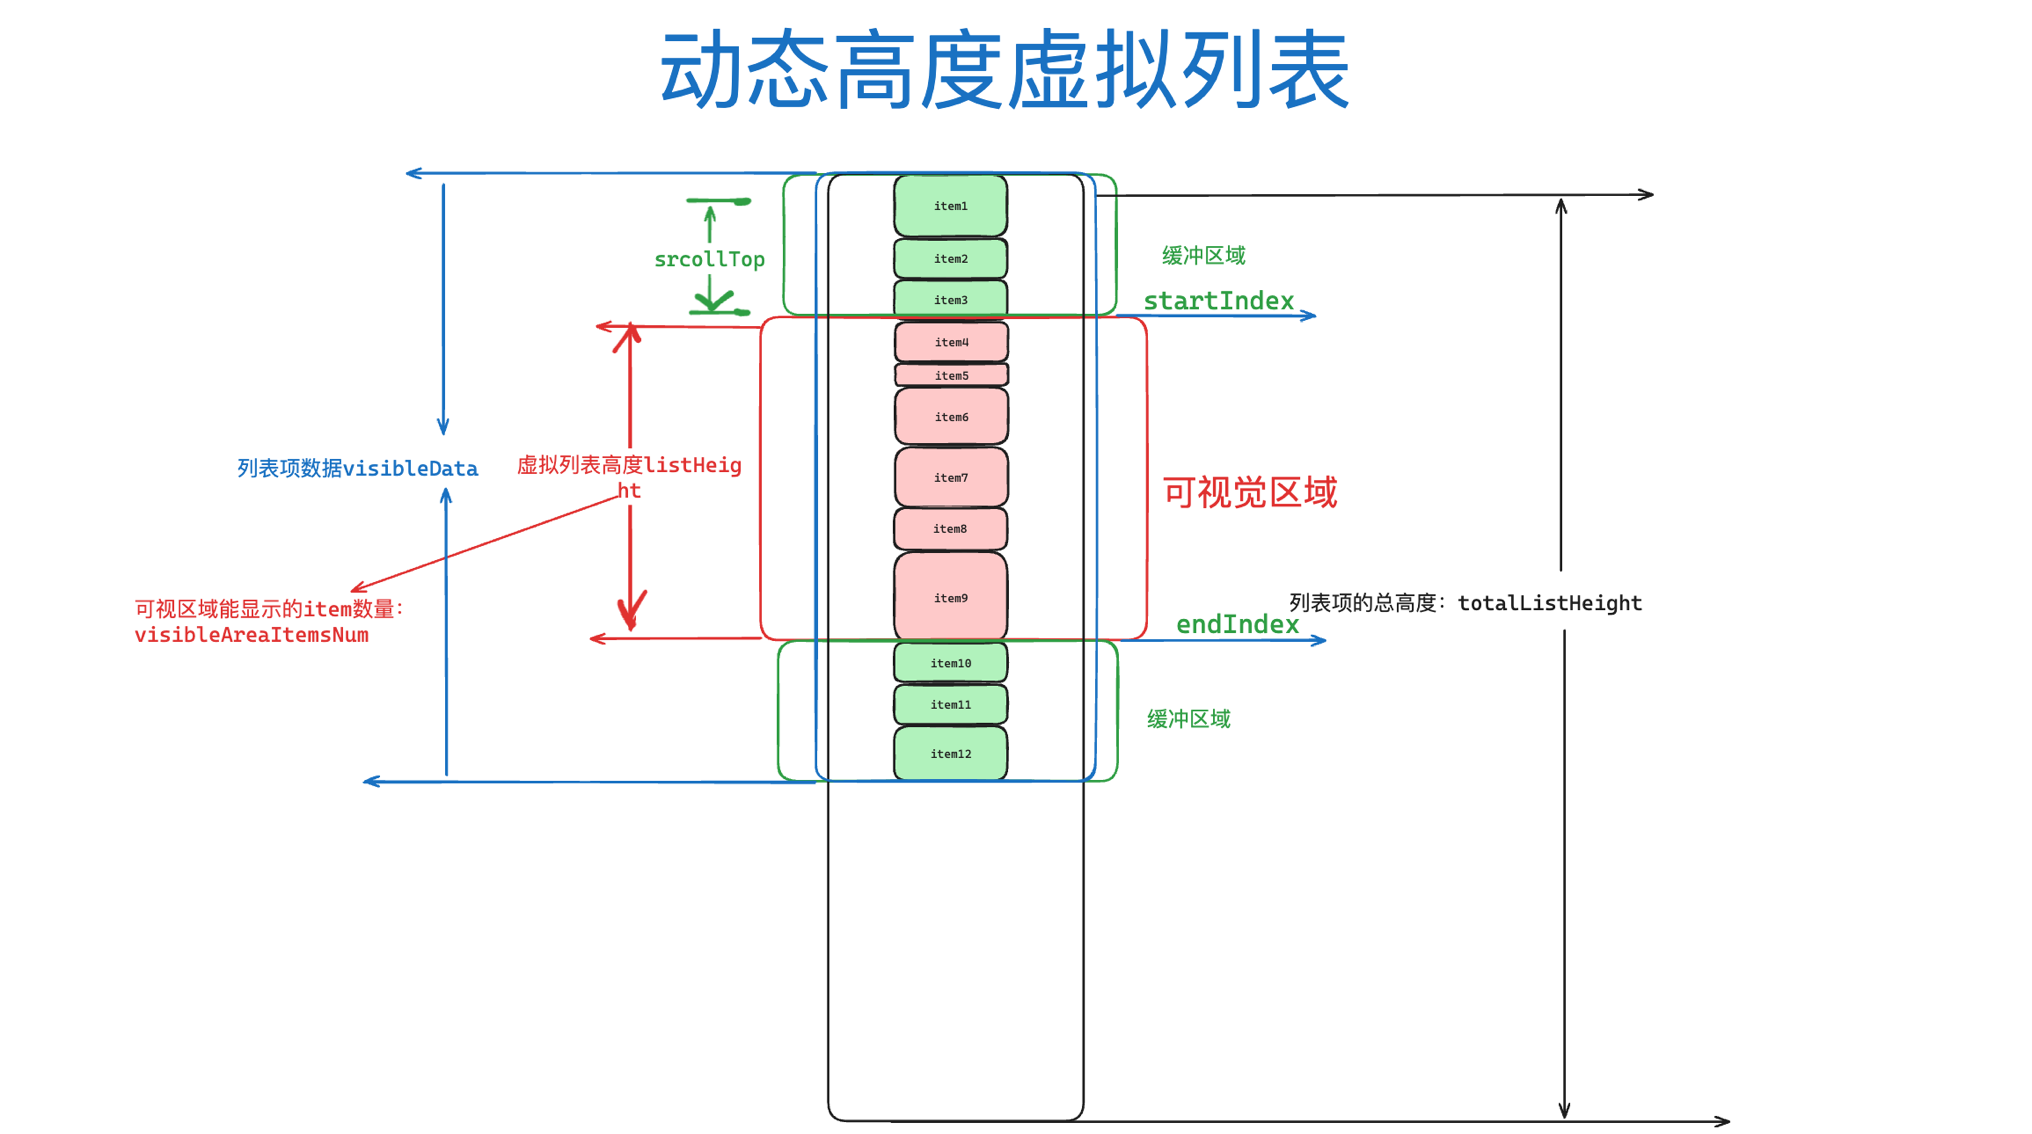
原理
原理主要是设置先设置一个默认的高度,并记录到缓存数据结构中,我们去监听节点的高度变换,在发生变化后重新计算缓存数据,然后更新列表。
实现
定义默认高度
在不定高的基础上我们更改代码如下 这里我们用的都是默认高度,因为后面渲染时监听节点变化会更新缓存数据
// 获取每一项的元数据const getItemMetaData = (index: number) => {const {measuredDataMap, LastMeasuredItemIndex} = measuredData;// 如果index大于当前记录的最大值,挨个计算到index去,用top+height一个一个计算if (index > LastMeasuredItemIndex) {let topOffset =LastMeasuredItemIndex >= 0? measuredDataMap[LastMeasuredItemIndex].topOffset +measuredDataMap[LastMeasuredItemIndex].height : 0;for (let i = LastMeasuredItemIndex + 1; i <= index; i++) {// 这里用的都是默认高度,因为后面渲染时会更新缓存数据measuredDataMap[i] = {height: 50, topOffset};topOffset += 50;}measuredData.LastMeasuredItemIndex = index;}return measuredDataMap[index];};
动态获取任意高度的项目
这里所有项目的高度都是通过getOneChildItem在渲染的时候动态获取到的。
// 获取任意高度的itemconst getRandomHeightItem = (() => {let items: ReactNode[] | null = null;return () => {if (items) return items;items = [];const itemCount = 1000;for (let i = 0; i < itemCount; i++) {const height = 30 + Math.floor(Math.random() * 30);const style = {height,width: '100%',};items.push(<ChildItem key={i} childIndex={i} itemStyle={style} />);}return items;};})();// 动态获取子集const DynamicChildItem = (options: DynamicChildItemProps) => {const {itemStyle, getChildItem, onSizeChange, childIndex} = options;const childRef = useRef(null);const resizeObserverRef = useRef<ResizeObserver | null>(null);useEffect(() => {const domNode = childRef.current;if (domNode) {if (!resizeObserverRef.current) {resizeObserverRef.current = new ResizeObserver(() => {onSizeChange(childIndex, domNode);});}resizeObserverRef.current.observe(domNode);}return () => {if (resizeObserverRef.current && domNode) {resizeObserverRef.current.unobserve(domNode);}};}, [childIndex, onSizeChange]);return (<div ref={childRef} style={itemStyle}>{getChildItem(childIndex)}</div>);};const getOneChildItem = (index: number) => getRandomHeightItem()[index];
调用
// 根据当前显示范围,插入节点,节点通过getOneChildItem动态获取const getCurShowChild = (scrollTop: number) => {const items = [];const {bufferStartIndex, bufferEndIndex} = getChildShowRange(scrollTop);for (let i = bufferStartIndex; i <= bufferEndIndex; i++) {const item = getItemMetaData(i);const itemStyle: CSSProperties = {position: 'absolute',height: item.height,width: '100%',top: item.topOffset,};items.push(<DynamicChildItemkey={`${i}${item.topOffset}`}childIndex={i}getChildItem={getOneChildItem}onSizeChange={sizeChangeHandle}itemStyle={itemStyle}/>,);}return items;};
监听节点宽高变化
通过监听节点的尺寸变化去更新缓存数据,然后触发虚拟列表重新渲染,实现动态高度渲染
useEffect(() => {const domNode = childRef.current;if (domNode) {if (!resizeObserverRef.current) {resizeObserverRef.current = new ResizeObserver(() => {onSizeChange(childIndex, domNode);});}resizeObserverRef.current.observe(domNode);}return () => {if (resizeObserverRef.current && domNode) {resizeObserverRef.current.unobserve(domNode);}};}, [childIndex, onSizeChange]);// 监听节点尺寸变化,更新measuredDataMap,触发重新渲染const sizeChangeHandle = (index: number, domNode: HTMLDivElement) => {const height = (domNode.children[0] as HTMLDivElement).offsetHeight;const {measuredDataMap, LastMeasuredItemIndex} = measuredData;measuredDataMap[index].height = height;let offset = 0;// 重新计算偏移值for (let i = 0; i <= LastMeasuredItemIndex; i++) {measuredDataMap[i].topOffset = offset;offset += measuredDataMap[i].height;}domNode.style.height = height + 'px';// 触发列表的一次更新setNeedUpdate(true);};
效果
参考文章
🍎 推荐阅读
工程化
本系列是一个从0到1的实现过程,如果您有耐心跟着实现,您可以实现一个完整的react18 + ts5 + webpack5 + 代码质量&代码风格检测&自动修复 + storybook8 + rollup + git action实现的一个完整的组件库模板项目。如果您不打算自己配置,也可以直接clone组件库仓库切换到rollup_comp分支即是完整的项目,当前实现已经足够个人使用,后续我们会新增webpack5优化、按需加载组件、实现一些常见的组件封装:包括但不限于拖拽排序、瀑布流、穿梭框、弹窗等
- 【前端工程化】项目搭建篇-项目初始化&prettier、eslint、stylelint、lint-staged、husky
- 【前端工程化】项目搭建篇-配置changelog、webpack5打包
- 【前端工程化】项目搭建篇-引入react、ts、babel解析es6+、配置css module
- 【前端工程化】组件库搭建篇-引入storybook、rollup打包组件、本地测试组件库
- 【前端工程化】包管理器篇-三大包管理器、npm工程管理、npm发布流程
- 【前端工程化】自动化篇-Github Action基本使用、自动部署组件库文档、github3D指标统计
- 【前端工程化】自动化篇-手写脚本一键自动tag、发包、引导登录npm
常见组件实现
面试手写系列
react实现原理系列
- 【react原理实践】使用babel手搓探索下jsx的原理
- 【喂饭式调试react源码】上手调试源码探究jsx原理
- 【上手调试源码系列】图解react几个核心包之间的关联
- 【上手调试源码系列】react启动流程,其实就是创建三大全局对象
其他
🍋 写在最后
如果您看到这里了,并且觉得这篇文章对您有所帮助,希望您能够点赞👍和收藏⭐支持一下作者🙇🙇🙇,感谢🍺🍺!如果文中有任何不准确之处,也欢迎您指正,共同进步。感谢您的阅读,期待您的点赞👍和收藏⭐!
感兴趣的同学可以关注下我的公众号ObjectX前端实验室
🌟 少走弯路 | ObjectX前端实验室 🛠️「精选资源|实战经验|技术洞见」